If you’ve ever been captivated by the vibrant and showy flowers of canna lilies, you’ll be thrilled to know that you can grow them from seed right in your own garden. Not only is this a cost-effective way to expand your collection, but it’s also a way to breed an array of exciting new varieties and colors. Advice on the best way to germinate calla lily seeds varies so we ran our own experiment to see what works best. In this comprehensive guide, we’ll walk you through the step-by-step process of growing canna lilies from seeds. Use our tried and tested germination techniques to guarantee your success!
Canna lilies are ideal for tropical style gardens
Canna lilies originate from the equatorial regions of Central and South America. These plants have a long history, with their cultivation dating back to ancient civilizations like the Aztecs and Incas. Over time, different Canna cultivars have been bred and hybridized to create a wide range of varieties with varying colors, sizes, and patterns.
Cannas can grow tall, reaching heights of 3 to 8 feet (0.9 to 2.4 meters), or a more manageable 1-2 feet (0.3-0.6 meters) for the dwarf canna varieties. Canna leaves are large and shaped like paddles, and they can be either solid green or have variegated patterns. Atop sturdy stems, these tropical plants showcase eye-catching, trumpet-shaped flowers. Mix and match your collection with a variety of colors, including red, orange, yellow, pink, and even combinations of these hues.
Canna lilies serve various purposes in gardens and landscapes. Their vibrant colors and lush foliage make them excellent focal points in tropical-style garden designs. Dwarf varieties also work well as border plants, defining spaces within a garden. Using a variegated type of canna lily adds year-round interest through the green, cream and yellow markings on the leaves.


Propagating canna lilies
You can propagate these plants through two main methods: dividing the canna rhizome and collecting seeds from canna plants. Rhizome division involves digging up the plant and separating the rhizomes into sections, each with at least one growing bud. Then replant the divisions at the appropriate spacing.
Growing canna lilies from seeds is a great choice as a propagation method. It is easy to do as most canna varieties will produce viable seed. The plants grown from seed are not always true to the parent plant, so this is an exciting way to breed your own new canna lily hybrids. If you only want to propagate plants that are identical to the parent you’ll need to use the rhizome division method.
What is the best way to grow canna lilies from seed?
As with any good experiment, we did some research first. There is a small amount of scientific literature available on the germination of canna lily seed. Here is a brief summary of some of the techniques described in the literature:
- Stratification: Canna lily seeds can be stratified by placing them in a container and storing them in a cool place, such as a refrigerator, for several weeks. This mimics the natural conditions that the seeds would experience over the winter months, and can help to break down the seed coat and promote germination.
- Scarification: Canna lily seeds have a hard outer seed coat that can be difficult to penetrate. Scarification techniques, such as nicking the seed coat with a sharp blade or soaking the seeds in warm water for several hours, can help to soften the seed coat and promote germination.
- Soaking: Some researchers have reported success with soaking canna lily seeds in a solution of gibberellic acid (GA3) or hydrogen peroxide (H2O2) to promote germination. Soaking the seeds in water for several hours can also help to promote germination.
- Temperature and moisture: Canna lily seeds require warm, moist conditions for germination. The optimal temperature range for germination is around 25-30 °C (77-86 °F), and seeds should be kept moist but not waterlogged during the germination process.
- Light: Canna lily seeds do not require light to germinate, but exposing the seedlings to bright light once they have sprouted can help to promote healthy growth.
Method
With that in mind, we set out to experiment with these different germination techniques to find out which ones work the best. To start we collected a bunch of dwarf canna lily seeds and discarded any that had obvious damage or discoloration. This is the most important step as this way we ensure that we are only attempting to germinate healthy and viable seeds.
How to collect canna lily seeds


Don’t deadhead your canna flowers as they are dying off. Leave them on the plant to develop a seed pod. When the flower finishes you’ll see some strange growths starting to emerge on the flower spike. They start as a green fleshy pod with a spiky surface. As they mature they dehydrate and turn brown. At this point the seed pods split open to reveal small black seeds, the size of a small pea. Now you can collect the seeds by gently breaking open the outer casing of the seed pod. Don’t worry about the spikes, they aren’t sharp at all.
If you aren’t going to plant your canna seeds straight away you’ll need to store them in a cool dry place away from direct sunlight.
Seed treatments
Next we divided the group in half and put one half in a container in the fridge for 30 days (stratification). We left the other half in an identical container at room temperature.
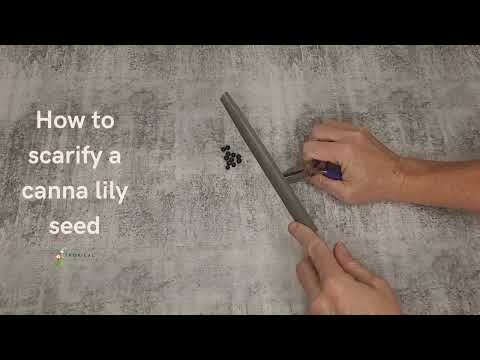
After the month had passed we divided each of these groups further. With a file we scraped some of the seed coating away from one group (scarification). After trying a few different ways to do this we settled on using a pair of pliers to firmly grasp the hard seed. It’s a tough little seed so you don’t need to worry about how hard you squeeze.
Then we took a large file and ran it back and forth across the seed coating about 10-15 times. Use the flat edge of the file to get the best contact with the seed. If you use the rounded edge you’ll find that it slips off the seed and isn’t as effective.
The next group were soaked in a solution of 3% hydrogen peroxide for 12 hours, and the last group didn’t have any treatment. You can get hydrogen peroxide from a pharmacy or a sometimes from the medical aisle in a large grocery store. It’s commonly used to disinfect wounds so look for it in the first aid or wound care section.
After this we divided the groups again and either planted them just below the surface of a commercial seed raising mix or put them in a container of water. Some were placed on a germination mat at 25 °C (77 °F) and the remainder sat on the same shelf beside the germination mat at a room temperature of 15-18 °C (59-65 °F). The shelf was near a large window for natural light and we didn’t use any supplementary light until after the seeds had sprouted.
Experimental groups
All those divisions get a bit confusing, so here’s a breakdown of the treatment and growing conditions that each experimental group of seeds had:
| Group | Stratification | Scarification | Soak in H2O2 | Medium | Temperature |
|---|---|---|---|---|---|
| 1 | ✔ | ✔ | Soil | 25 °C | |
| 2 | ✔ | Soil | 25 °C | ||
| 3 | ✔ | ✔ | Soil | 15-18 °C | |
| 4 | ✔ | ✔ | Water | 25 °C | |
| 5 | ✔ | Water | 25 °C | ||
| 6 | ✔ | ✔ | Water | 15-18 °C | |
| 7 | ✔ | Water | 15-18 °C | ||
| 8 | ✔ | ✔ | Water | 25 °C | |
| 9 | ✔ | ✔ | Water | 15-18 °C | |
| 10 | ✔ | Soil | 15-18 °C | ||
| 11 | ✔ | ✔ | Soil | 25 °C | |
| 12 | ✔ | Soil | 25 °C | ||
| 13 | ✔ | ✔ | Soil | 15-18 °C | |
| 14 | ✔ | Soil | 15-18 °C | ||
| 15 | ✔ | Water | 15-18 °C | ||
| 16 | ✔ | Water | 25 °C |
Results
The three treatments that boosted germination and growth rates of the canna lily seeds were
- Scarification
- Germination at 25 °C / 77 °F
- Germination in soil medium

All of the experimental groups with scarified seeds had 100% germination rate and were the fastest to germinate. Stratification (cold storage for one month) and soaking in hydrogen peroxide improved the germination time, but not as much as scarification did.
Germinating in the soil medium didn’t have much of an impact on time to germinate but it had a significant effect on the growth rate of the seedling. That’s because the water doesn’t contain any nutrients but the potting soil contains an abundance of nutrients specially formulated to boost growth.
After 5 weeks many of the seeds had still not germinated while those in groups 3, 4, 5 and 10 had strong growth with multiple leaves forming. There was no germination in groups 11-16, and only 1/3 of the seeds in groups 6 and 8 had germinated.
After three months groups 6 and 8 had no further germination and groups 14-16 had still had zero germination.
Post-germination growth
We transferred each germinated seed into a tube pot when a leaf bud started to form. You can see this in the center seed in the photo above. For the seeds that were germinated in soil, we transplanted them when the first leaf was starting to develop its green color.
Following that, as each of the young plants developed a full leaf we put them under a grow light for 16 hours a day with a room temperature averaging 20 °C (68 °F). For best results with any propagation technique it’s important to replicate the plant’s ideal conditions to give it a head start in life. Not only does this improve the growth rate, but it improves the plant’s natural disease and pest resistance.
When roots were visible at the base of the tubes we transplanted the seedling into a larger pot and transitioned it to a full sun position outdoors where they were protected from frost. Finally, in late spring they were planted into their final positions in the garden (see below).
What is the most successful method for germinating canna lily seeds?
Based on this experiment, and supported by the scientific literature, the best method for germinating canna lily seeds is:
- Store seeds in a refrigerator for one month
2. Scarify the seeds by filing away a small patch of the hard black coating
3. Fill a pot with potting soil and plant the seeds about 5mm (1/4 in) deep.
4. Place the pot in a warm place (at least 25 °C / 77 °F).
Following these steps you should expect to see the first seeds sprouting in 5-8 days and could be producing flowers within 6 months.
What’s the best time to plant canna lily seeds?
With the right conditions you can grow canna lilies from seed at any time, but late winter and early spring are the best, especially if you aren’t in the tropics.
This timing means that your canna lily plant has enough time to develop leaves and start to form a healthy rhizome to be able to produce gorgeous tropical flowers in summer. Start your seeds indoors then plant out into 4 inch pots once your seedling has three leaves.
Plant out the new plants in your garden when the danger of frost has passed. This canna plant is 6 months old and was grown from seed.

How to grow Canna lilies
To grow canna lilies successfully, it is essential to consider their planting location. These hardy plants thrive in warm climates and are best suited for planting in USDA hardiness zones 7 to 11. They prefer full sun to partial shade conditions, requiring at least 6 hours of direct sunlight each day. They can handle hot sun better than many other plants so don’t be afraid to try them in challenging spots. Tall varieties however are vulnerable to damage from strong winds so they may need a windbreak or staking.
Well-drained soil with ample organic matter is crucial for their healthy growth, especially in the first year as they develop a rhizome. Regular watering is important during the growing season, as they prefer consistently moist but not waterlogged soil. Mulching around the base of the plant helps retain moisture and suppress weed growth. Established cannas are drought tolerant but their flower production will suffer.

Regular fertilization with a balanced, slow-release fertilizer promotes healthy foliage and abundant blooms. To encourage continuous flowering, it is advisable to remove faded flowers. However, if you are planning to collect seed you’ll need to leave them to develop into a seed pod.
In warmer climates, cannas are perennial so you can enjoy them year round. In colder climates, it is necessary to lift and store the rhizomes in a frost-free location during winter. You can plant them in large containers and keep them in a greenhouse or store them in a dark place ready for planting out after the last frost date.

Still have questions?
Are there concerns that were not addressed here? We’re here to help.
References
- Alexander, C. (2016). How to grow cannas. BBC Gardeners’ World Magazine. Retrieved from https://www.gardenersworld.com/how-to/grow-plants/how-to-grow-cannas/
- Burchett, S., & Graham, S. (2006). Germination of Canna lily seed as affected by scarification, gibberellic acid, and chilling. HortScience, 41(6), 1407-1410. https://doi.org/10.21273/HORTSCI.41.6.1407
- Darlington, A. B. (2019). Growing cannas from seed. Canna Council Australia. Retrieved from https://www.cannacouncilaustralia.org/growing-cannas-from-seed/
- Fisher, K. (2020). Germinating cannas. The Canna Society. Retrieved from https://www.thecannasociety.co.uk/articles/germinating-cannas/
- Taylor, P. (2011). Cannas: An easy guide to growing cannas. The Telegraph. Retrieved from https://www.telegraph.co.uk/gardening/howtogrow/8478687/Cannas-an-easy-guide-to-growing-cannas.html
This article was written and researched by:
Last updated on:
We think you might like to take a look at these too:
- How to choose the best pots for Monstera plants

- Backyard tropical landscaping ideas for along a fence

- Ultimate palm trees for around pools in your climate

- Gunnera is banned in the UK: What you need to do now

- Is stone or mulch best for tropical garden landscaping?

- How to propagate Philodendron Birkin: 3 easy methods
